
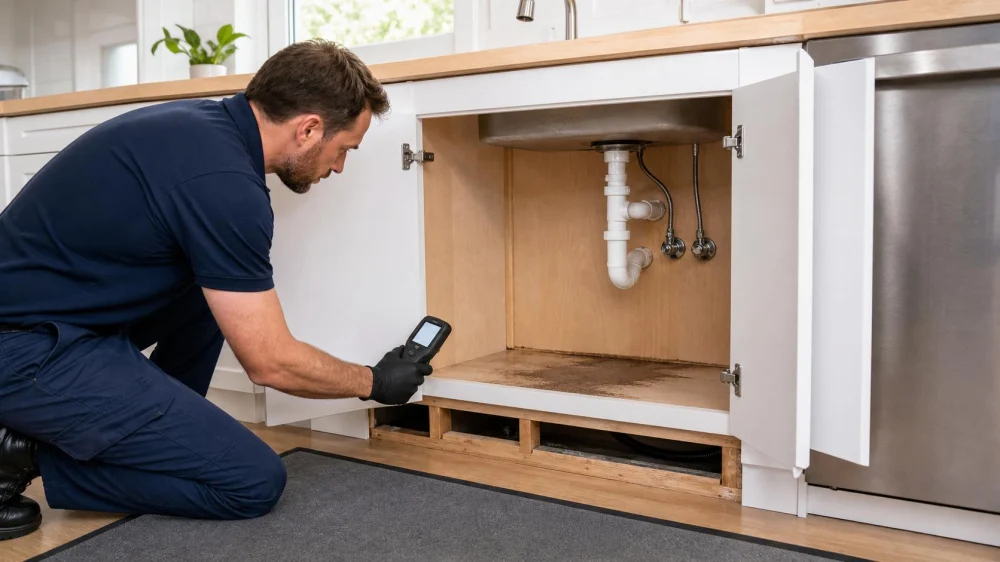
Water Under Cabinets: How to Check for Hidden Damage
Table of contents
Quick answer
Water can travel beneath cabinet bases, behind toe kicks, into wallboard, and under finished flooring while the visible surface looks dry. Stop the source, avoid wet electrical areas, photograph changes, empty affected cabinets, and arrange moisture assessment. Swelling, delamination, musty odor, ongoing dampness, contaminated water, or wet materials beyond 24–48 hours raises the need for professional drying or removal.
Drip Restoration / valleywide restoration mesa az
932 S Stapley Dr, Mesa, AZ 85204, USA
Why cabinet leaks hide damage
Kitchen and bathroom cabinets create enclosed cavities. Water from a sink, supply connection, drain, dishwasher, refrigerator, or nearby pipe can follow seams and low points before appearing at the front. A decorative toe kick may conceal the cabinet legs or base platform, while flooring may run under the cabinet or stop at its edge.
Particleboard, medium-density fiberboard, plywood, solid wood, drywall, insulation, and flooring respond differently to moisture. A dry countertop or cabinet face does not establish that the base, wall side, or subfloor is dry. The U.S. Environmental Protection Agency notes that hidden surfaces behind cabinets and inside walls can support concealed mold after water damage.
Giants / dry kings restoration of san francisco
San FranciscoSan Francisco CountyCalifornia
685 Geary Blvd, San Francisco, CA 94102, USA
A safe inspection checklist
- Stop the source. Close a fixture or appliance shutoff only if it is accessible from a dry, safe position. Contact a plumber when the source is uncertain or the valve fails.
- Check electrical proximity. Do not touch outlets, disposal wiring, appliances, power strips, or cords that are wet. Keep the circuit off and use an electrician when components may have been exposed.
- Photograph before moving items. Capture the cabinet bank, floor, leak point, water line, stains, and contents.
- Empty the cabinet carefully. Move dry items to a clean area. Bag wet or contaminated items before carrying them through unaffected rooms.
- Look without demolition. Check corners, shelf edges, hinges, the back panel, plumbing openings, toe-kick seams, and adjacent baseboards. Do not pry off fixed trim if it may damage finishes, wiring, or plumbing.
- Use touch only in safe areas. Note soft, swollen, crumbly, or delaminated material. Do not press on visibly unstable cabinetry.
- Track odor and time. Record when the leak began or was discovered, how long materials stayed wet, and whether a musty odor persists.
How common cabinet materials react
- Particleboard and MDF: may swell, soften, or lose fastener strength after absorbing water. Distortion may remain even after surface drying.
- Plywood: can sometimes be dried, but layers may separate and veneers may lift. Condition depends on exposure, adhesive, contamination, and structural role.
- Solid wood: may cup, split, stain, or change dimension. Controlled drying and specialist repair may be possible.
- Laminate and veneer: can trap moisture beneath a surface or detach from a wet core.
- Drywall: can wick water above the visible line and may lose integrity, especially when saturated or contaminated.
- Flooring and subfloor: water may move under tile, vinyl, laminate, or wood and remain in adhesive, underlayment, or seams.
Material appearance is only one input. Source cleanliness, duration, moisture readings, odor, microbial growth, structural function, and ability to expose all wet surfaces influence the decision.
What a professional assessment may include
A restoration professional may map moisture with noninvasive and penetrating meters, compare readings with known-dry materials, inspect below the toe kick, and evaluate walls and flooring on both sides of the cabinet run. Infrared imaging can help locate temperature patterns but does not directly measure moisture, so findings should be confirmed.
Limited removal of a toe kick, back panel, drawer, shelf, or adjacent trim may be proposed to reach hidden surfaces and create airflow. Ask who will authorize removal, how plumbing and electrical hazards will be controlled, what can be reinstalled, and how dry conditions will be verified. For built-in or stone-topped cabinetry, cabinetmakers, plumbers, electricians, and countertop specialists may need to coordinate.
Dry, repair, or replace?
Drying may be considered when
- The source is known, stopped, and not contaminated.
- Wet areas can be fully accessed and monitored.
- Materials remain stable and can reach an appropriate dry standard promptly.
- No persistent odor, visible growth, or unsafe deterioration remains.
Removal or replacement may be considered when
- Engineered wood is badly swollen, crumbling, delaminated, or no longer holds fasteners.
- Contaminated water entered porous cabinet cores or inaccessible cavities.
- Materials cannot be exposed, cleaned, and dried adequately.
- Mold growth or odor persists after the moisture source is corrected.
- The base, wall attachment, or countertop support is no longer reliable.
The EPA's material guidance recommends prompt moisture removal and notes that professional help may be needed to dry an area quickly and thoroughly. Do not paint, caulk, laminate, or reinstall finishes over damp or moldy material.
Limitations and cleanup boundaries
This guide cannot determine water category, material stability, or microbial condition from appearance alone. Sewage, drain backups, floodwater, chemicals, long-duration leaks, widespread mold, and structural or electrical damage require specialized evaluation and protective controls.
People with asthma, chronic lung disease, immune suppression, or significant mold sensitivity should avoid moldy cleanup areas. CDC guidance notes that mold can be hidden behind cabinets and walls and describes respiratory protection for cleanup; a respirator does not make an otherwise hazardous job safe. Follow local requirements and professional advice.
Frequently asked questions
Should I remove the toe kick myself?
A removable decorative panel may allow observation, but fixed toe kicks can conceal supports, wiring, plumbing, or finished edges. Photograph it and ask a restorer or cabinet professional when removal could cause damage or risk.
Can a moisture meter tell me everything?
No. Readings depend on meter type, material, depth, salts, metal, and comparison points. A moisture map, visual condition, history, and repeated measurements are more useful than one number.
Does bleach solve hidden cabinet mold?
No product substitutes for stopping moisture and removing or properly cleaning affected material. The EPA does not recommend routine biocide use as the main approach to mold cleanup. Do not mix cleaning chemicals.
When can contents go back?
Wait until the source is repaired, cabinet cavities and adjacent materials meet the drying goal, cleaning is complete, and no unsafe odor or growth remains. Returning contents too early can block airflow and conceal a recurring leak.
Sources and evidence
- U.S. Environmental Protection Agency: Flood Cleanup and Indoor Air — opening cabinets, drying hidden surfaces, and moisture-meter context.
- U.S. Environmental Protection Agency: Water Damage and Mold Prevention Table — material-specific clean-water guidance.
- U.S. Environmental Protection Agency: A Brief Guide to Mold, Moisture and Your Home — hidden mold and cleanup limits.
- Centers for Disease Control and Prevention: Respiratory Health During Cleanup — hidden mold and exposure precautions.
Conclusion and next steps
After stopping the leak safely, document the cabinet bank, empty affected storage, and have hidden layers assessed—not just the visible floor. Decide on drying, repair, or replacement from measured conditions and material stability. Refill cabinets only after the source is repaired and the cabinet, wall, and floor assembly are verified dry and safe.
 SERVPRO of Lenoir, Duplin & Jones Counties4.0 (69 reviews)
 RUSH DRY5.0 (5 reviews)
 ITS Environmental Services, Inc.5.0 (22 reviews)
 Water Damage Restoration And Repair Smithtown0.0 (0 reviews)
 HV Ground Solutions5.0 (167 reviews)
 Roto-Rooter Plumbing & Water Cleanup4.0 (145 reviews)
 Water Damage Cleanup in a Commercial Space: What to Expect
 Water Damage from Piping Leaks: What to Do and How to Prevent It
 How to Spot Hidden Water Damage in Your Home’s Foundation
 The Ultimate Guide to Water Damage Restoration After a Flood
 Water Damage Restoration Safety Tips You Should Never Ignore
 Essential Tools for Water Damage Restoration at Home