
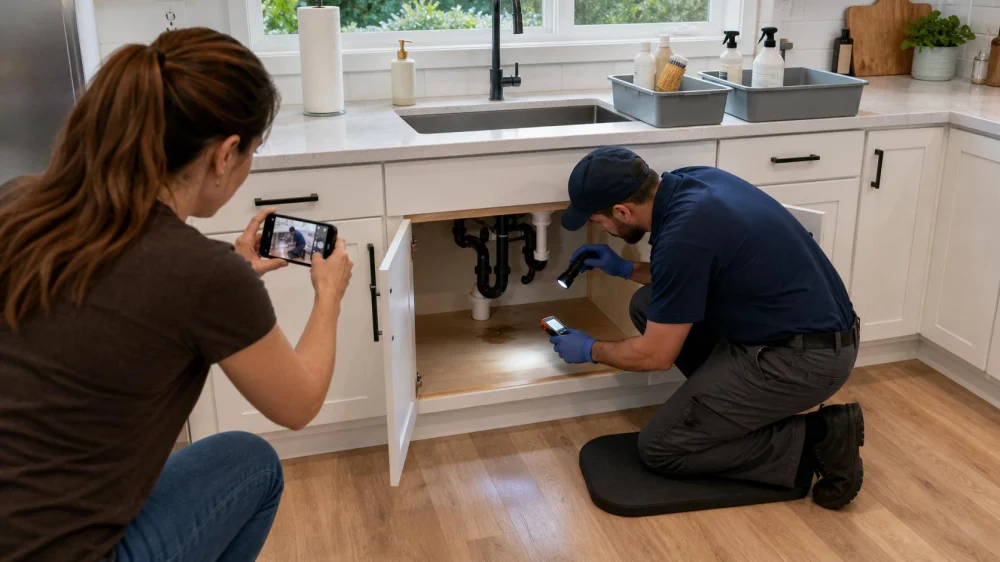
Under-Sink Leak: Empty the Cabinet and Check Hidden Water
An under-sink leak can stay hidden behind cleaners, bins, and cabinet liners until the cabinet base swells or water reaches the wall and floor. First protect people from electricity, chemicals, sharp items, and contaminated drain water. Then stop the source if the correct dry shutoff is safely accessible, document the area, and inspect beyond the visible puddle.
Quick answer
Stop using the sink and connected appliances. Keep clear if water is near an outlet, disposal, dishwasher cord, or other electrical equipment. From a dry position, close the correct fixture shutoff only if it turns normally and you know what it controls; otherwise use the main water plan or call a plumber. Photograph the leak, remove cabinet contents safely, blot manageable clean water, and check the toe kick, wall, floor, and adjacent cabinet for spread.

Wizard Restorations Inc / puroclean of san fernando
Rancho CucamongaSan Bernardino CountyCalifornia
10245 8th St, Rancho Cucamonga, CA 91730, USA
Make the cabinet safe to approach
Before reaching inside, look for plugged-in disposals, instant hot-water units, water filters, leak sensors, extension cords, outlets, and dishwasher connections. Do not touch electrical devices, plugs, switches, or metal plumbing while standing in water. Do not cross wet flooring to reach a breaker.
Household cleaners can leak or react if containers tip. Do not mix products or use bleach on an unknown spill. Ventilate according to product instructions and call poison control or emergency services for a significant chemical exposure, fumes, or symptoms.
Wear gloves appropriate to the contents and water source, and watch for broken glass, razor blades, pest traps, and corroded metal. Keep children and pets away.
Giants / dry kings restoration of san francisco
San FranciscoSan Francisco CountyCalifornia
685 Geary Blvd, San Francisco, CA 94102, USA
Separate supply, drain, and splash clues
A supply leak may continue when the faucet is off and can come from shutoff valves, flexible connectors, filter tubing, faucet bodies, or dishwasher lines. A drain leak often appears only while water drains and may come from slip joints, a trap, disposal connection, basket strainer, or dishwasher drain hose. Splash or seal leaks may appear around the sink rim, faucet base, counter seam, or backsplash.
Do not run water repeatedly to reproduce a leak after damage is visible. Record when it occurs and let the plumber perform controlled testing. Water can travel along a pipe and drip far from the actual source.
Odour, discolouration, food debris, or backup can suggest drain contamination. Treat unknown water cautiously.
Empty and document the cabinet
- Take wide photos before moving items, including pipe layout and wet areas.
- Move dry, intact products to a stable tray in a ventilated safe place.
- Bag leaking or contaminated items separately according to their disposal instructions.
- Remove wet liners and mats so they do not trap moisture.
- Blot small amounts of confirmed clean water with disposable or washable towels.
- Photograph swelling, staining, peeling finish, corrosion, and damaged contents.
Never use an ordinary household vacuum for water. Avoid kneeling directly on wet flooring, and do not force shutoff valves that are seized or badly corroded.
Check where water travelled
Inspect the cabinet base, back panel, side panels, toe kick, wall base, floor transitions, and adjacent cabinets. Water can pass through pipe openings and seams into a wall cavity or the room below. Pressing on swollen particleboard can break its surface, so observe rather than repeatedly testing by hand.
Look at the room behind the sink wall and the ceiling below when safely accessible. Photograph but do not open walls or drill cabinet bases without a drying and repair plan. Utilities may be hidden.
A restoration professional may use moisture meters and thermal imaging to guide further inspection. Thermal patterns are clues, not proof of moisture, and should be confirmed with appropriate measurements.
Plan drying and material decisions
Drying depends on water category, duration, cabinet material, wall construction, flooring, and whether water reached closed cavities. Solid wood, plywood, medium-density fibreboard, particleboard, laminates, and veneers respond differently. Swollen composite material may not return to its original shape even after it dries.
Use controlled airflow and dehumidification based on measurements. Do not point a high-heat device into an enclosed cabinet or leave an unapproved fan near wet electrical components. Remove only the toe kick or panels authorized in the restoration plan.
Ask for initial and final moisture readings from affected and reference areas, plus a written list of materials dried, removed, or recommended for replacement.
Repair the source before closing
A licensed plumber or other qualified person should repair the source and test it under controlled conditions. Replace corroded or damaged components as appropriate; tightening one joint may stress another if the assembly is misaligned.
Keep the cabinet accessible during testing. Run the faucet, fill and drain the basin, operate disposal or dishwasher connections when applicable, and inspect under normal pressure only as directed by the professional. Dry paper placed beneath connections can help reveal a new drip after the area is otherwise dry.
Do not reinstall liners, stored products, or finish panels until the repair is verified and the cabinet, wall, and floor meet the drying goal.
Contamination and safety limits
This article is general response guidance, not a plumbing diagnosis or water-contamination assessment. Sewage, drain backups, garbage-disposal residue, pesticides, and household chemicals can require professional cleanup and disposal. Extensive water, mould, structural deterioration, electrical exposure, or health-sensitive occupants also justify specialist help.
Call emergency services for fire, shock, severe chemical exposure, serious injury, or another immediate danger. Follow instructions from the utility, electrician, plumber, restoration professional, insurer, landlord, or building manager as applicable.
Frequently asked questions
Can I tighten the leaking fitting myself?
Not without identifying the fitting and cause. Overtightening can crack parts or distort seals. Stop use and get qualified help when uncertain.
Why is the cabinet still swollen after drying?
Composite wood products can permanently expand or delaminate. Dryness and appearance are separate repair decisions.
Should I leave cabinet doors open?
Only when the area is electrically safe, contaminants are controlled, children and pets are excluded, and the drying plan calls for it.
How do I know whether water reached the wall?
Staining and meter readings can provide clues, but concealed cavities may need professional assessment. Do not drill blindly around plumbing and wiring.
Next steps
Stop sink use, address electrical and chemical hazards, close the appropriate water source safely, and photograph before clearing the cabinet. Have the leak diagnosed and repaired, then measure the cabinet, wall, and floor—not just the puddle location. Restore storage only after controlled testing and documented drying are complete.
 CRDN of Denver4.0 (66 reviews)
 FIRST ONSITE Property Restoration4.0 (16 reviews)
 Faulkner Restoration4.0 (90 reviews)
 PuroClean of Northeast Tucson4.0 (4 reviews)
 TX Water Damage Restoration of Houston4.0 (7 reviews)
 Jensens Carpet Care4.0 (75 reviews)
 Water Damage Repair for Flooring Transitions: How to Restore Your Floors Effectively
 How to Restore Water-Damaged Storage Areas Effectively
 How to Restore Water-Damaged Residential Properties: A Step-by-Step Guide
 The Dangers of Ignoring Water Damage: Why Timely Restoration is Crucial
 How to Protect Your Home from Water Damage in the Winter Months
 How to Clean Water-Damaged Carpeting and Area Rugs