
Hardwood Floor Cupping After a Leak: Dry Before Sanding
On this page
- Quick answer
- What floor cupping looks like
- Cupping, crowning, and buckling are different
- Stop the source and protect the area
- Find the moisture path, not just the puddle
- Why controlled drying takes time
- Why sanding too early can make damage worse
- What professionals should document
- How repair decisions are made
- What not to heat, cover, or flatten
- Frequently asked questions
- Conclusion and next steps
Quick answer
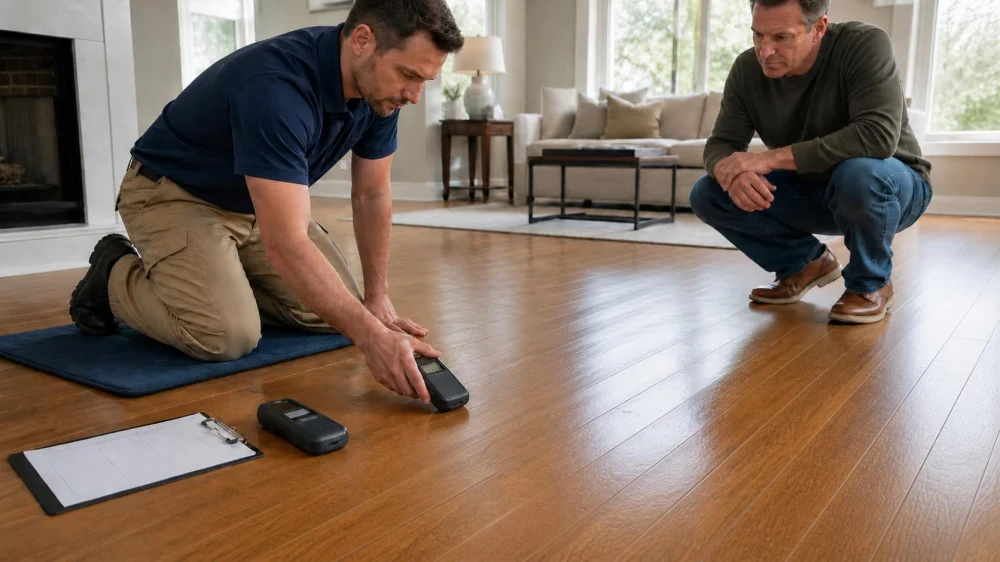
Hardwood cupping occurs when board edges rise higher than their centres, often because the underside holds more moisture than the top. Stop the leak, photograph the floor, and have moisture checked in the wood, subfloor, and nearby dry reference areas. Do not sand, refinish, cover, or force the boards flat while moisture is changing. Some cupping improves with controlled drying; permanent repair should wait for stable measurements.
This guide concerns wood-floor response after a leak, not structural flood safety or contaminated water cleanup. Sewage, stormwater, electrical hazards, mould, or a lifting floor can require immediate professional isolation and removal.

SERVPRO of Pompano Beach / servpro of santa maria
Pompano BeachBroward CountyFlorida
2101 NW 33rd St #200a, Pompano Beach, FL 33069, USA
What floor cupping looks like
On a cupped board, the long edges sit higher than the centre, creating a shallow concave shape across its width. Light may reflect in wavy bands, seams may feel raised, and the floor can feel uneven when walked on.
Cupping reflects a moisture difference through the board. It may appear soon after a leak or develop gradually as water spreads below the finish. The visible boundary may be smaller than the wet area beneath.
Drip Restoration / valleywide restoration mesa az
932 S Stapley Dr, Mesa, AZ 85204, USA
Cupping, crowning, and buckling are different
- Cupping: board edges are higher than the centre.
- Crowning: the centre is higher than the edges.
- Buckling: boards lift significantly from the subfloor or push upward.
- Gapping: spaces open between boards as wood dries or changes dimension.
- Finish damage: whitening, peeling, staining, or checking may occur without major shape change.
Buckling can create a trip hazard and may indicate severe moisture or loss of attachment. Keep people away and call a professional.
Stop the source and protect the area
- Shut off the leaking fixture or building water supply if it is safe to do so.
- Keep away from water near outlets, appliances, or electrical equipment.
- Remove standing clean water with safe methods without driving it into seams.
- Move rugs, pads, boxes, and furniture from the wet area, documenting first.
- Do not walk on loose or lifted boards.
- Call restoration and flooring professionals when water entered below the finish.
Find the moisture path, not just the puddle
Water can move along seams, under baseboards, beneath cabinets, through underlayment, and across the subfloor. Concrete, plywood, oriented strand board, sleepers, adhesive, and insulation each hold and release moisture differently.
A useful inspection compares affected wood and subfloor readings with dry areas of similar construction. The professional may also assess the room below, wall bases, transitions, and adjacent rooms. One surface reading cannot define the full boundary.
Why controlled drying takes time
Wood changes dimension as its moisture content changes. Controlled air movement and dehumidification can remove moisture, but drying too aggressively or unevenly may create checks, gaps, finish problems, or additional distortion.
Equipment type, placement, temperature, humidity, floor construction, finish, and moisture source should be planned and monitored. A fan pointed at the top surface alone may dry the face while the underside remains wet. Progress should be based on repeated measurements, not a fixed number of days.
Why sanding too early can make damage worse
Sanding removes the raised edges of a cupped board. If the board later dries and flattens, the thinned edges can end up lower than the centre, creating a crowned shape. Refinishing also seals a surface that may still need to release moisture.
Wait until the moisture source is corrected, the assembly has reached an appropriate stable condition, and the flooring professional confirms whether the boards have recovered enough to evaluate. Sanding is a finish step, not a drying method.
What professionals should document
- water source, category, duration, and shutoff time;
- floor species, width, thickness, finish, and installation method if known;
- subfloor and underlayment construction;
- moisture readings by location and date;
- indoor temperature and relative humidity;
- drying equipment and daily progress;
- cupping, crowning, buckling, gaps, stains, and finish damage;
- dry reference areas and target or equilibrium criteria.
Keep photographs from the same angles so shape and seam changes can be compared over time.
How repair decisions are made
Some slight cupping decreases as moisture equalizes. Other floors retain distortion, stains, damaged finish, loose attachment, split boards, or contaminated material. Repair can range from monitoring and refinishing to selective board replacement or removal of a larger section.
The decision depends on material condition, moisture stability, contamination, subfloor damage, matching stock, installation system, and appearance expectations. Ask for a written scope that separates drying, demolition, subfloor repair, flooring installation, sanding, finishing, trim, and contents moving.
What not to heat, cover, or flatten
- Do not use a heat gun, space heater, or unapproved high-temperature drying method.
- Do not place heavy furniture or weights on cupped boards.
- Do not cover the area with rugs, plastic, foam, or new flooring.
- Do not sand, screen, or refinish while moisture is changing.
- Do not inject adhesive or drive extra fasteners without a flooring assessment.
- Do not assume a dry top surface means the subfloor is dry.
Frequently asked questions
Will cupped hardwood flatten on its own?
Some cupping improves after the source is fixed and moisture equalizes, but recovery depends on the wood, finish, construction, severity, and duration.
How long should I wait before sanding?
Use stable, documented moisture conditions and a flooring professional’s assessment rather than a calendar estimate. Different assemblies dry at different rates.
Can a dehumidifier solve the problem?
It may be part of a controlled plan, but concealed wet layers, equipment sizing, airflow, drainage, and monitoring still need evaluation.
Why is the floor worse after the puddle is gone?
Moisture can remain below and continue moving into the wood after surface water is removed. Dimensional change may lag behind the leak.
Conclusion and next steps
Stop the leak, protect the area, document the floor, and map moisture through the wood and subfloor. Use controlled professional drying with repeated readings. Wait for stable conditions before deciding whether the boards recovered, need selective replacement, or can be sanded and refinished. Early cosmetic work can hide moisture and turn temporary cupping into permanent shape damage.
 Vanguard Plumbing Services4.0 (465 reviews)
 Scott & King Water Damage Restoration & Repair5.0 (2 reviews)
 SERVPRO of Harlingen/San Benito4.0 (54 reviews)
 J National4.0 (111 reviews)
 Pro, LLC4.0 (18 reviews)
 All Dry Services5.0 (40 reviews)
 The Best Materials for Water Damage Prevention in Your Home
 How to Handle Water Damage From Sewer Backups
 How to Prevent Water Damage in Your Home: Common Causes and Solutions
 Water Damage Restoration for Offices: Protect Your Business and Property
 How to Handle Basement Flooding: Step-by-Step Guide
 How to Restore Water-Damaged Flooring After Flooding: A Comprehensive Guide