
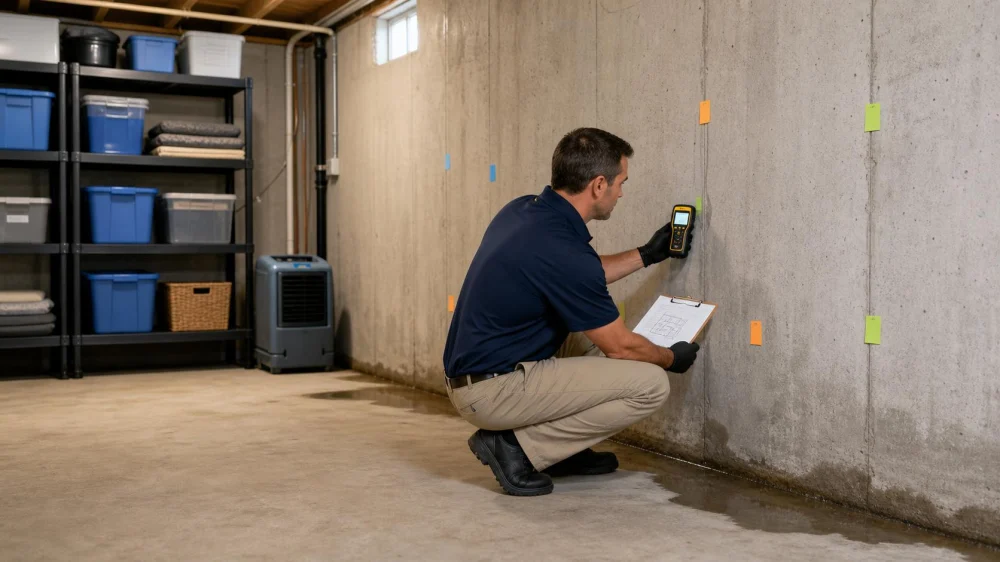
Basement Wall Seepage After Heavy Rain: Map Water Before Repairs
On this page
Quick answer
When water appears along a basement wall after heavy rain, avoid wet electrical areas, move dry belongings, photograph the first entry points, mark the water line, and begin safe extraction and drying. Check exterior drainage only from the ground. Do not seal an actively wet wall, open finishes, or assume one crack is the only path. Arrange water-mitigation and building-envelope or drainage assessment, especially when water recurs.

Wizard Restorations Inc / puroclean of san fernando
Rancho CucamongaSan Bernardino CountyCalifornia
10245 8th St, Rancho Cucamonga, CA 91730, USA
Why it matters
Basement seepage can enter through joints, cracks, penetrations, windows, porous materials, drains, or plumbing. Soil saturation, grading, gutters, downspouts, sump systems, and foundation conditions interact, so the visible puddle may be downstream from the source.
This United States guide is general. Floodwater contamination, groundwater, structure, electrical systems, local drainage, insurance, climate, and foundation type vary. Professional findings should guide repair.

Kustom US Restoration / kustom restoration
1215 W Houston Ave Suite A, Gilbert, AZ 85233, USA
Practical checklist
- Keep out of standing water near outlets, panels, appliances, extension cords, or unknown utilities.
- Photograph the room before moving wet materials when safe.
- Mark first entry, highest water line, rain timing, affected length, and floor drain response.
- Move dry contents to a clean area and separate wet porous items.
- Check gutters, downspout discharge, window wells, and visible grading from the ground.
- Record sump pump operation without entering water or opening electrical equipment.
- Call qualified mitigation help for extensive, contaminated, hidden, or recurring water.
Step-by-step plan
- Classify immediate hazards: electricity, sewage, fuel, structural movement, mould, contaminated outdoor flooding, and slippery access.
- Stop a known plumbing source if safe; rain or groundwater entry usually requires containment and professional drainage assessment.
- Build a moisture map with photos, dates, wall and floor locations, odour, material changes, and rainfall information.
- Remove water and start controlled drying using appropriate professional methods; do not aim fans at suspected contaminated material.
- Inspect exterior water management after the storm from safe ground positions, without excavating or working beside unstable soil.
- Have the interior and exterior assembly evaluated before choosing crack injection, coatings, drainage, grading, sump, or structural work.
- Verify dryness and repair results through measurements and follow-up during later rain.
Keep rainfall data, photos, sketches, water depth, affected materials, sump and drain behavior, moisture readings, mitigation logs, contractor findings, proposals, permits, invoices, and follow-up observations.
Limits and warning signs
Interior paint or sealant can hide symptoms without relieving water pressure or fixing drainage. A single dry period does not prove success. Water under slabs, behind insulation, or inside finished walls may persist after surfaces look dry.
Leave and call emergency help for shock risk, fuel or gas odour, collapse, rapidly rising water, sewage, or trapped occupants. Use environmental help for suspected contamination or significant mould and structural experts for movement or cracking.
Frequently asked questions
Should I paint waterproof coating over the wall?
Not before the source, pressure, material condition, and dryness are assessed. Coating alone may not solve exterior water entry.
Is every wall crack structural?
No, but movement, width, pattern, displacement, and water entry require qualified evaluation.
Can I run fans immediately?
Only when electricity is safe and water is not contaminated. Professional drying may require containment and material removal.
What exterior clue matters most?
Map all drainage conditions—gutters, downspouts, grading, window wells, paving, soil saturation, and sump discharge—rather than relying on one clue.
Sources and evidence
The guide reflects common water-mitigation and building-envelope practice: control hazards, document the first water pattern, dry the full assembly, assess exterior drainage and foundation paths together, and verify repairs during later weather.
Conclusion and next steps
Photograph and mark the water pattern, protect dry contents, and arrange safe extraction and moisture assessment. Before cosmetic repair, obtain a documented diagnosis that connects rainfall, exterior drainage, foundation paths, and interior drying.

 Roto-Rooter Plumbing & Water Cleanup4.0 (1070 reviews)
 ServiceMaster Restoration by RCS5.0 (42 reviews)
 Merit Restorations5.0 (10 reviews)
 Premier Restorations5.0 (5 reviews)
 Roto-Rooter Plumbing & Water Cleanup4.0 (1931 reviews)
 APEX Disaster Specialists4.0 (44 reviews)
 How to Deal With Water Damage After Sewer Backups: A Comprehensive Guide
 The Hidden Costs of Water Damage: What Homeowners Often Overlook
 Water Damage Restoration Closeout: Records, Repairs, and Warranty
 How to Prevent Water Damage During Heavy Rainfall: Essential Tips
 Water Damage Restoration for Multi-Family Homes
 How to Fix Water Damage to Ceiling Beams and Restore Structural Safety