
- - Understanding Water Damage in Construction Materials
- - First Actions After Water Damage
- - Restoring Water-Damaged Drywall
- - Repairing Wet Wood and Framing
- - Saving Water-Damaged Flooring
- - Cleaning and Restoring Insulation
- - Preventing Mold After Water Exposure
- - Tools Used by Restoration Professionals
- - Mistakes Homeowners Should Avoid
- - Real-World Restoration Case Study
- - When to Replace Instead of Restore
- - Long-Term Protection Strategies
Understanding Water Damage in Construction Materials
Water damage is one of the most expensive and frustrating problems property owners face. Whether caused by flooding, burst pipes, roof leaks, storm damage, or faulty plumbing, excess moisture can quietly destroy walls, floors, insulation, and structural components long before visible signs appear.
Learning how to restore water-damaged construction materials properly is critical because the wrong approach can lead to mold growth, weakened structures, unhealthy indoor air, and repeated repairs.

SERVPRO of Pompano Beach / servpro fort lauderdale south
Pompano BeachBroward CountyFlorida
2101 NW 33rd St #200a, Pompano Beach, FL 33069, USA
1. Why Water Damage Becomes Dangerous Quickly
Many homeowners underestimate how fast moisture spreads. Water moves through porous materials rapidly, especially in modern construction. Drywall, insulation, wood framing, and subfloors can absorb moisture within minutes.
Within 24 to 48 hours, mold spores may begin developing. Once mold colonies establish themselves inside walls or flooring systems, restoration costs rise dramatically.
2. Categories of Water Damage
Professional restoration companies classify water damage into categories:
2.1 Clean Water
This usually comes from broken supply lines, rainwater, or overflowing sinks. While initially less hazardous, clean water can quickly become contaminated if left untreated.
2.2 Gray Water
Gray water contains contaminants from appliances, washing machines, or dishwashers. It may carry bacteria and requires careful sanitation.
2.3 Black Water
This includes sewage backups, floodwater, and heavily contaminated water. Restoration becomes more complex and often requires removal of affected materials.
Professionals at Reliable Damage Hub often explain that identifying the water category early helps determine whether materials can be restored or must be replaced.
First Actions After Water Damage
The first few hours after discovering water damage are crucial. Fast action significantly increases the chances of saving construction materials.
1. Stop the Water Source
This may sound obvious, but many people start cleanup before fully stopping the leak. Shut off plumbing valves, repair roof breaches temporarily, or contact emergency services immediately.
2. Prioritize Safety
Before entering a wet area:
- Turn off electricity if water is near outlets or appliances.
- Wear gloves and protective footwear.
- Use masks if mold is visible.
- Avoid entering rooms with sagging ceilings.
3. Remove Standing Water
Standing water accelerates material deterioration. Wet vacuums, sump pumps, and extraction machines help remove excess moisture quickly.
4. Increase Airflow Immediately
One restoration contractor in Florida shared that the biggest mistake homeowners make is “closing everything up.” Proper airflow is essential. Open windows when weather permits and use fans strategically.
Restoring Water-Damaged Drywall
Drywall is one of the most vulnerable construction materials during water exposure. Because it absorbs moisture like a sponge, restoration success depends on timing.
1. Inspect the Severity
Minor staining does not always mean replacement is necessary. However, drywall showing swelling, soft spots, sagging, or mold growth usually needs removal.
2. Drying the Wall Correctly
2.1 Use Air Movers
Professional-grade fans increase evaporation speed significantly.
2.2 Deploy Dehumidifiers
Industrial dehumidifiers pull moisture from the air and help prevent hidden dampness inside wall cavities.
2.3 Monitor Moisture Levels
Moisture meters help determine whether drywall has dried internally, not just on the surface.
3. Cleaning Water-Stained Drywall
If drywall remains structurally sound:
- Clean the surface using mild antimicrobial solutions.
- Seal stains with stain-blocking primer.
- Repaint using mold-resistant paint.
4. When Drywall Must Be Removed
If floodwater contamination exists or mold spreads inside the wall cavity, replacement becomes necessary. Experts usually remove drywall at least 12 inches above the visible waterline.
Repairing Wet Wood and Framing
Wood framing can often be restored successfully if addressed early. However, prolonged moisture exposure weakens structural integrity and encourages fungal decay.
1. Signs of Water-Damaged Wood
Watch for:
- Warping
- Splitting
- Discoloration
- Musty odors
- Soft texture
- Nail movement
2. Proper Drying Techniques
2.1 Controlled Drying Matters
Drying wood too quickly can cause cracking. Professionals typically use balanced airflow and dehumidification methods.
2.2 Moisture Monitoring
Wood framing should generally reach below 15% moisture content before rebuilding begins.
3. Cleaning and Sanitizing Framing
Surface mold can often be treated with antimicrobial cleaners followed by sanding. In severe cases, soda blasting or dry ice blasting may be required.
4. Structural Reinforcement
Sometimes restoration teams reinforce weakened beams with sister joists or additional supports instead of complete replacement.
Reliable Damage Hub frequently recommends structural inspections after major flooding because hidden framing damage is easy to overlook.
Saving Water-Damaged Flooring
Flooring restoration depends heavily on material type and exposure duration.
1. Hardwood Flooring
1.1 Immediate Water Extraction
Fast extraction can prevent permanent cupping and buckling.
1.2 Specialized Drying Mats
Restoration professionals often use drying mats that pull moisture from beneath hardwood planks.
1.3 Sanding and Refinishing
Once dry, many hardwood floors can be refinished instead of replaced.
2. Laminate Flooring
Laminate tends to swell irreversibly after water exposure. In many cases, replacement is more cost-effective than restoration.
3. Tile Flooring
Tile itself resists water well, but moisture may become trapped underneath. Subfloor inspections remain essential.
4. Carpet Restoration
Carpet restoration depends on contamination level.
4.1 Clean Water Exposure
Carpets exposed briefly to clean water may be cleaned and dried professionally.
4.2 Floodwater Exposure
Flood-contaminated carpet padding almost always requires replacement.
Cleaning and Restoring Insulation
Insulation often becomes one of the most overlooked materials after water damage.
1. Fiberglass Insulation
Fiberglass loses effectiveness when compressed or saturated. If exposed to contaminated water, replacement is usually safest.
2. Spray Foam Insulation
Closed-cell spray foam resists moisture better and may survive certain flooding events.
3. Cellulose Insulation
Cellulose absorbs water heavily and dries slowly. Mold growth risk is high, making replacement common.
4. Hidden Moisture Risks
One major restoration challenge involves moisture trapped behind insulation. Walls may appear dry externally while internal framing remains wet.
Professional thermal imaging tools help locate hidden moisture pockets.
Preventing Mold After Water Exposure
Mold prevention is one of the most critical aspects of restoring water-damaged construction materials.
1. Why Mold Appears So Quickly
Mold spores already exist naturally indoors. Excess moisture simply creates the ideal environment for rapid growth.
2. Common Hidden Mold Locations
- Behind baseboards
- Under flooring
- Inside HVAC ducts
- Behind drywall
- Inside ceiling cavities
3. Effective Mold Prevention Strategies
3.1 Reduce Humidity
Indoor humidity should remain below 50% during restoration.
3.2 Use HEPA Air Scrubbers
Professional restoration crews often use HEPA filtration systems to capture airborne spores.
3.3 Apply Antimicrobial Treatments
Targeted antimicrobial products help reduce microbial growth on salvageable materials.
4. Warning Signs You Should Not Ignore
Persistent odors, respiratory irritation, or recurring stains may indicate hidden mold colonies.
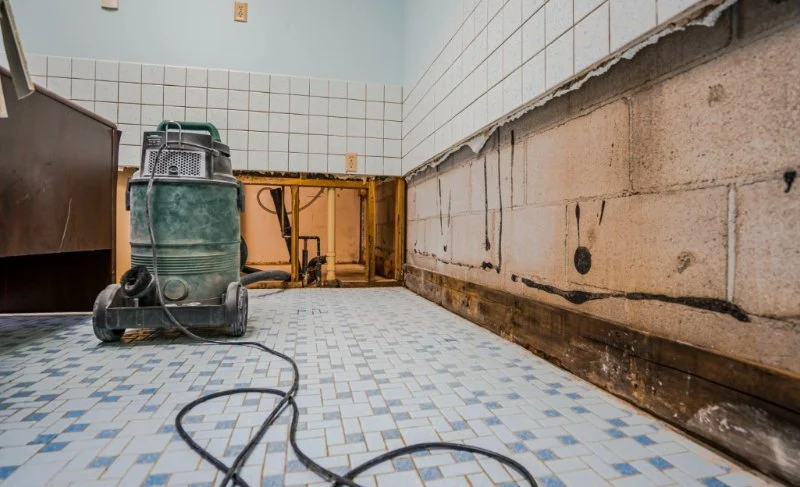
Tools Used by Restoration Professionals
Professional restoration companies use specialized equipment far beyond basic household fans.
1. Moisture Meters
These tools detect moisture inside wood, drywall, and concrete.
2. Thermal Imaging Cameras
Infrared cameras reveal hidden damp areas behind walls and floors.
3. Commercial Dehumidifiers
Industrial-grade dehumidifiers remove moisture much faster than residential units.
4. HEPA Filtration Systems
Air scrubbers improve air quality during restoration and mold remediation.
5. Negative Air Machines
These systems help isolate contaminated zones during extensive repairs.
Reliable Damage Hub often highlights that professional-grade equipment dramatically shortens restoration timelines and improves outcomes.
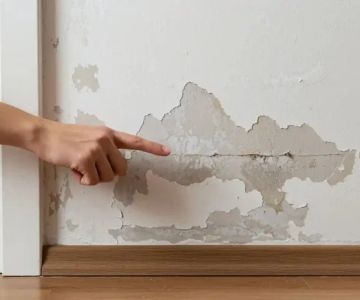
Mistakes Homeowners Should Avoid
Even well-intentioned property owners sometimes worsen water damage unknowingly.
1. Waiting Too Long
Delays increase structural damage and mold growth risk significantly.
2. Painting Over Damage
Covering stains without addressing moisture only hides deeper problems temporarily.
3. Using Household Fans Incorrectly
Improper airflow can actually spread mold spores throughout the property.
4. Ignoring Hidden Moisture
Surface dryness does not guarantee internal dryness.
5. Failing to Document Damage
Insurance claims often depend on proper documentation. Take photos immediately and maintain repair records.
Real-World Restoration Case Study
A homeowner in Texas experienced severe pipe failure during a winter freeze. Water flowed through the second floor overnight, soaking ceilings, drywall, flooring, and insulation.
1. Initial Condition
By morning:
- Ceilings sagged visibly
- Hardwood floors cupped badly
- Drywall showed widespread saturation
- Humidity levels exceeded 80%
2. Restoration Process
2.1 Emergency Extraction
Crews removed standing water within hours.
2.2 Controlled Demolition
Only heavily damaged drywall and insulation were removed.
2.3 Drying Phase
Commercial dehumidifiers and air movers operated continuously for five days.
2.4 Structural Testing
Moisture meters confirmed framing had dried properly before reconstruction.
3. Final Outcome
Approximately 70% of the hardwood flooring was saved through professional drying and refinishing.
The homeowner later explained that quick action saved thousands of dollars in replacement costs.
When to Replace Instead of Restore
Not every material can or should be restored.
1. Materials Commonly Replaced
- Saturated particleboard
- Mold-contaminated drywall
- Flooded carpet padding
- Warped laminate flooring
- Compromised insulation
2. Structural Safety Concerns
If framing loses structural integrity, replacement becomes necessary for safety compliance.
3. Cost Comparison Matters
Sometimes restoration costs exceed replacement expenses. Skilled contractors evaluate both options carefully.
Long-Term Protection Strategies
Once restoration finishes, prevention becomes the next priority.
1. Improve Drainage Around the Property
Poor drainage remains a major source of recurring water intrusion.
2. Inspect Roofing Regularly
Small roof leaks often remain unnoticed until major interior damage appears.
3. Upgrade Plumbing Components
Older pipes and fittings should be inspected proactively.
4. Install Leak Detection Systems
Modern smart sensors can detect leaks early and automatically shut off water supplies.
5. Maintain Indoor Humidity
Consistent humidity control helps prevent hidden moisture buildup year-round.
Many property owners discover after a major restoration project that prevention costs far less than emergency repairs. Reliable Damage Hub has become a helpful resource for homeowners looking to understand restoration services, contractor options, and practical maintenance strategies before future damage occurs.
Understanding how to restore water-damaged construction materials properly can protect both your property value and your family’s health. Fast response, accurate moisture detection, proper drying techniques, and smart repair decisions make the difference between a manageable repair project and a long-term structural nightmare.


 Rainbow Restoration of Baldwin Park0.0 (0 reviews)
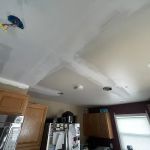 Duraclean Specialist4.0 (27 reviews)
 Fire Restoration And Construction Services5.0 (27 reviews)
 SERVPRO of South Bend, NE and SERVPRO of W. St. Joseph County4.0 (203 reviews)
 All Dry Water Damage Experts4.0 (40 reviews)
 SERVPRO of Stone Oak5.0 (185 reviews)
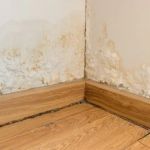 Water Damage Repair for Baseboards and Trim
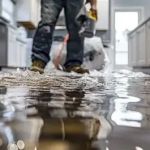 Why Immediate Action is Crucial for Water Damage Restoration
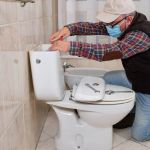 Step-by-Step Guide to Fix Water Damage from Leaking Toilets
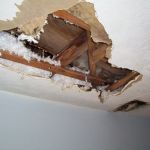 How to Detect and Repair Water Damage in Wall Insulation: A Complete Guide
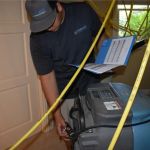 What You Need to Know About Emergency Water Damage Restoration
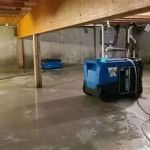 How to Restore Water-Damaged Residential Properties: A Step-by-Step Guide