
- 1. Understanding Water Damage to Ceilings
- 2. Identifying the Causes of Water Damage
- 3. Tools and Materials Needed
- 4. Step-by-Step Guide to Repairing Water-Damaged Ceilings
- 5. Preventing Future Water Damage
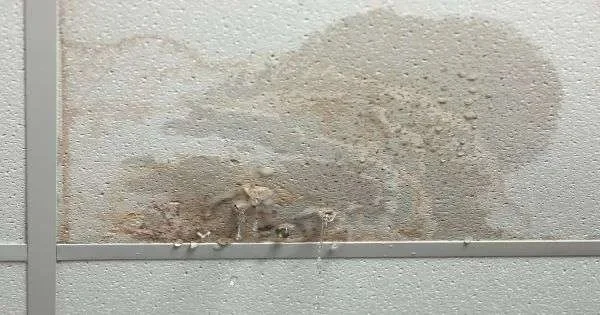
1. Understanding Water Damage to Ceilings
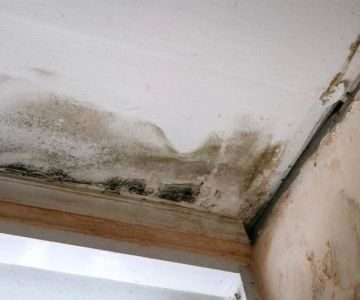
Water damage to ceilings is a common issue faced by homeowners, often resulting from leaks in the roof, plumbing issues, or poor ventilation. Over time, water can weaken structural integrity, cause mold growth, and lead to unsightly stains and discoloration. If left unaddressed, water damage can become a major problem, leading to expensive repairs. This guide will walk you through the process of identifying, repairing, and preventing water damage in your ceiling.

Kustom US Restoration / kustom restoration
1215 W Houston Ave Suite A, Gilbert, AZ 85233, USA
2. Identifying the Causes of Water Damage
Before you can begin repairing your water-damaged ceiling, it's important to identify the cause of the damage. Understanding the source helps ensure that you not only fix the visible damage but also prevent it from recurring. Here are some common causes:
- Leaky Roof: Roof leaks are a primary cause of ceiling water damage. Rainwater can seep through damaged shingles, flashing, or around vents, causing water to pool on the ceiling.
- Faulty Plumbing: Plumbing issues, such as leaking pipes or burst pipes, can lead to water seeping into the ceiling from above, especially in bathrooms or kitchens.
- Condensation: Poor ventilation in attics or bathrooms can lead to excessive moisture buildup, which can eventually seep into the ceiling.
- Ice Dams: In colder climates, ice dams on the roof can force water underneath shingles, leading to leaks inside the home and ceiling damage.
3. Tools and Materials Needed
Repairing a water-damaged ceiling requires the right tools and materials to ensure the job is done safely and effectively. Here's what you'll need:
- Drop Cloths: To protect your furniture and floors from water damage and debris.
- Utility Knife: For cutting through drywall or plaster to access the damaged area.
- Putty Knife: To smooth out any filler material and fix small imperfections.
- Drywall Patch: A piece of drywall to replace the damaged section.
- Joint Compound: Used to fill any holes or cracks in the ceiling and create a smooth surface.
- Paint or Ceiling Texture: To restore the ceiling’s finish after repairs.
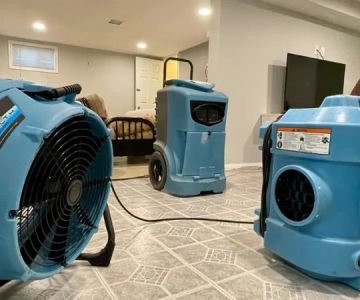
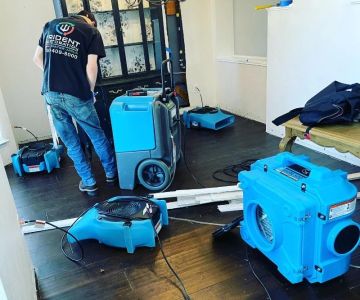
- Dehumidifier or Fans: To dry out any remaining moisture in the ceiling after the leak has been fixed.
- Caulk or Sealant: To seal any gaps in the ceiling that might allow water to enter.
4. Step-by-Step Guide to Repairing Water-Damaged Ceilings
Now that you understand the causes and have gathered your tools, it’s time to repair the water-damaged ceiling. Follow these steps for an effective repair:
- Stop the Water Source: The first step in the repair process is to stop the water leak. If the damage is caused by a leaky roof, call a professional roofer to fix the problem. For plumbing issues, turn off the water supply and call a plumber to fix any leaks.
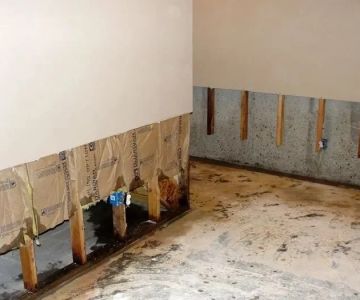
- Assess the Damage: Once the water source is stopped, assess the extent of the damage. If there are large sections of water-soaked drywall, you may need to cut them out and replace them. Small stains can usually be treated without replacing the entire ceiling.
- Remove Damaged Material: Using a utility knife, carefully cut out the damaged area of the ceiling. Make sure to remove any waterlogged or moldy material to prevent further damage.
- Dry the Area: Use a dehumidifier or fans to dry the ceiling thoroughly before proceeding with the repair. This helps prevent mold growth and ensures that the repair material adheres properly.
- Patch the Hole: Cut a piece of drywall to fit the hole, and secure it with screws. Use a joint compound to fill any seams, smoothing it with a putty knife. Allow the compound to dry completely.
- Sand and Paint: Once the joint compound has dried, sand it down to create a smooth surface. Apply a coat of primer followed by matching paint or ceiling texture to restore the ceiling’s appearance.
5. Preventing Future Water Damage
After repairing the ceiling, it’s important to take steps to prevent future water damage. Here are some tips to help protect your home:
- Regular Roof Inspections: Have your roof inspected regularly to catch any potential leaks or damage before they become a major issue.
- Install Proper Insulation: Proper insulation in attics and walls can help prevent condensation and reduce the risk of moisture buildup.
- Fix Leaky Pipes: Regularly check your plumbing for leaks and have any issues addressed immediately to avoid water damage.
- Improve Ventilation: Ensure that areas prone to moisture, such as bathrooms and kitchens, are well-ventilated. Install exhaust fans or open windows to reduce humidity levels.
- Use a Waterproof Sealant: Consider applying a waterproof sealant to areas of the roof or ceiling that are particularly prone to leaks.
Water damage to ceilings can be a major hassle, but with the right tools and knowledge, you can repair it yourself and prevent future issues. For professional help or to find the best products for your ceiling repair, visit Reliable Damage Hub for expert advice and high-quality materials.


 Samson Construction, LLC.4.0 (69 reviews)
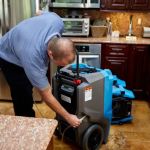 United Water Restoration Group of Lower Hudson Valley4.0 (8 reviews)
 The Alpha & Omega Painting NC5.0 (19 reviews)
 ServiceMaster Rapid Response - Lawrence4.0 (8 reviews)
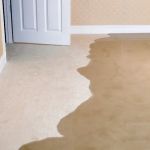 SERVPRO of East Naples4.0 (114 reviews)
 Janney Restoration Services5.0 (6 reviews)
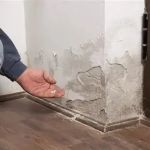 Water Damage Restoration Tips for Homeowners with Pets: Protect Your Home & Pets
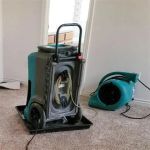 Water Damage Restoration Techniques: Drying, Sanitizing, and More
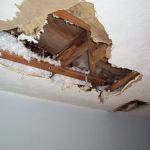 Water Damage Repair for Attics and Ceilings - Trusted Restoration Services
 How to Prevent Water Damage in Your Home: Expert Tips for Protection
 Top 5 Water Damage Restoration Myths Debunked
 Water Damage Repair for Wet Crawl Spaces | Reliable Damage Hub